In standard desktop GIS software applications, it is a common task to display geo-referenced images. I wanted to be able to do the same using just a modern browser and an Internet connection. So after a few late nights, I completed writing this
Google Mapplet to load and display local image files with associated
ESRI world files as custom overlays in
Google Maps. I had to use the HTML5
FileReader objects so only modern browsers such as Chrome, FireFox, Internet Explorer 10 will work.
- To run the mapplet, simply go to the site http://dominoc925-pages.appspot.com/mapplets/geoimage.html.

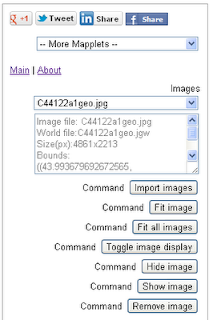
- In the sidebar, click the Import Images button.
The Import image dialog box appears.

- In the Image file field, click the button. Browse and select an image file e.g. C44122a1geo.jpg.
- In the World file field, click the button. Browse and select the corresponding ESRI world file e.g. C44122a1geo.jgw.
- If the image file is in the non-projected coordinate system, then choose Geographic in the Coordinate system type combo box. If the image file is in a projected coordinated system, then choose Projected.
Note: the raster image transformation for projected coordinate system to the Google Maps Mercator coordinate system is not very accurate. The positioning would be more accurate if the raster image were already in non-projected or Mercator coordinate system.
- If the image file is in a projected coordinate system, then choose the correct projection in the Projection combo box.
- In the Geodetic Datum field, choose the horizontal datum of the image file, e.g. WGS84, Global Definition.

- Click Start Import.
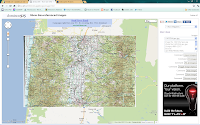
The image is loaded and displayed.

If necessary, click the Fit image or Fit all images buttons in the sidebar to center the map display on the image(s).
- Optional. If you want to load more images, then repeat the previous steps 3 to 8.
- Click Close.

 In standard desktop GIS software applications, it is a common task to display geo-referenced images. I wanted to be able to do the same using just a modern browser and an Internet connection. So after a few late nights, I completed writing this Google Mapplet to load and display local image files with associated ESRI world files as custom overlays in Google Maps. I had to use the HTML5 FileReader objects so only modern browsers such as Chrome, FireFox, Internet Explorer 10 will work.


No comments:
Post a Comment